
If you're looking to replace the stock subwoofer with something better the Rockville SS10P is quite a bargain for the changes. To make the install easier you can use the Niche+Easy Brackets to make the whole setup bolt in. Some minor wiring will need to be completed to plug the sub in. Here is the list of tools and parts needed for the install.
Tools:
Parts:
To begin open the trunk and fold up the rear section of the floor cover.
![Image]()
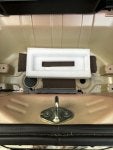
Next remove the subwoofer cover by first removing the 2 clipped in side covers. To remove the whole cover just pull straight up and it will pop out.
![Image]()
![Image]()
Remove the latch surround trim. Remove the 2 plastic screw caps. This can be done with your fingers by spinning them like a nut.
![Image]()
![Image]()
To remove the cover pull it out far enough to clear the screws and then pull straight up. Should pop right off.
![Image]()
If you have a GT (Not a GT Line) you will have to remove the rear brace. Remove each of the 4x 10mm bolts holding it on.
![Image]()
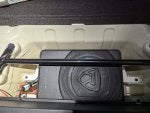
Unplug and remove the stock subwoofer. There will be 4x 10mm bolts holding it in. (These pics were taken for reference, but show the new sub already installed)
Take your new sub and flip it over so that the bottom is facing upwards.
![Image]()
Take the two smaller brackets (rear) and attach them to the subwoofer using the screws supplied in the kit. In these pictures the input side of the subwoofer is to the left. Install the brackets so that they slope towards the middle and not away from the sub as shown.
![Image]()
Install the two large brackets (front) and attach them to the other side. See pics below for the correct orientation.
![Image]()
Tools:
- 10mm socket
- Ratchet
- Ratchet extension
- Phillips screwdriver
- Wire Cutter
- Wire Stripper
Parts:
- Rockville SS10P
- Niche+Easy Bracket Set (PM me to order)
- Sub Input Pigtail (Or you can cut off the original plug from the OEM Subwoofer) Can be ordered HERE
- Cigarette lighter plug for power (If you want a more permanent setup do some research on using the trailer wiring) Cigarette Lighter Plug HERE
- Wire splicing items of some sort x4
To begin open the trunk and fold up the rear section of the floor cover.
Next remove the subwoofer cover by first removing the 2 clipped in side covers. To remove the whole cover just pull straight up and it will pop out.
Remove the latch surround trim. Remove the 2 plastic screw caps. This can be done with your fingers by spinning them like a nut.
To remove the cover pull it out far enough to clear the screws and then pull straight up. Should pop right off.
If you have a GT (Not a GT Line) you will have to remove the rear brace. Remove each of the 4x 10mm bolts holding it on.
Unplug and remove the stock subwoofer. There will be 4x 10mm bolts holding it in. (These pics were taken for reference, but show the new sub already installed)
Take your new sub and flip it over so that the bottom is facing upwards.
Take the two smaller brackets (rear) and attach them to the subwoofer using the screws supplied in the kit. In these pictures the input side of the subwoofer is to the left. Install the brackets so that they slope towards the middle and not away from the sub as shown.
Install the two large brackets (front) and attach them to the other side. See pics below for the correct orientation.
")